2 for 1
Update to this post: If you are looking for detailed instructions on how to knit 1 sock inside the other it starts here about half way down the post: prep work for 2 at once socks
I love knitted socks, I love the way they look and with so many beautiful designs out there you would think I would be tempted... but I'm not a sock knitter. It's not the small needles and it's not the fine yarn the problem I have with socks is you have to make two. I had the same problem with sleeves when I used to knit sweaters in pieces, you finish one and there's another one waiting and in my case waiting and waiting and waiting.... but for some reason a couple of weeks ago I got the sock bug and decided to tackle knitting 2 socks at once, one inside the other and I have to say this might be the start of something for me.
 For one who doesn't knit socks I sure have a lot of sock yarn in my stash! I started with Misti Alpaca's Hand Paint Sock yarn a beautiful Alpaca, Merino, Silk and nylon blend and #1 DPN's. I referenced a woman's basic sock pattern estimating the number of stitches to cast on for a toddler then followed Elizabeth Zimmerman's way for the rest of it.
 What I love about Elizabeth Zimmermans way of instructing is it reminds me of my mom, "you do a bit of this and then you do that and then you have your sock". My mom used to tell me when I came to her with a knitting problem "you know how to knit and you know how to purl, you'll figure it out". An enabler she wasn't!
For the how to of knitting one inside the other I checked out youtube and found some helpful videos. There are also instructions in Interweave Knit's "Knitting Traditions" from Winter of 2010 which I forgot I had until I was almost finished with the socks. After reading their instructions I was glad I just winged it and let common sense guide me. Not that I found them confusing it's just once you have the stitches on the needles it's clear how you have to knit them.
You start by casting on the total amount to be knit for each sock on 2 separate needles with 2 balls of yarn. I cast 50sts on each needle using an Estonian Cast On for elasticity. Consider one to be needle A, the other needle B. Then place one stitch from each needle on a 3rd needle so they line up A,B,A,B.
I decided to make it easier on myself by knitting the socks in stockinette stitch. I was going to do a ribbed cuff with a kitchener cast on and even thought I could work 2 separate cuffs and join them later but felt like that would be cheating. Plus what's the point of 2 in one if you don't start from the beginning! They did suggest doing just that in the "Knitting Traditions" instructions though by the time I read that I was almost finished.
Using a hand painted yarn makes it easier to differentiate the 2 socks. Like in this photo the orange stitches are the outer sock, the purple stitches the inner sock. For the outer sock both strands of yarn are in back and you knit the outer sock using the designated strand (it makes sense once you get knitting). For the inner sock the strand for the outer sock comes in front of the needle the stitches are on and you knit the 2nd strand leaving this first one in front. You have to keep them separated when knitting so they don't cross and connect the 2 socks. I did that once and it was a real pain to rip out and put all the stitches back on the needles.
At this point I've turned the heel. Once you've worked this far how to turn the heel will make sense to you, hopefully! I didn't check but I'm sure there are more video's online for this too.

Heel and instep finished! You will need an extra needle when working decreases. Like working cables you have to rearrange the stitches at the decrease points to again keep the socks separated.

The toe I decreased down to 7 stitches. Before grafting the stitches are placed on their own needles for each sock. Graft the inner sock first, then the outer sock.
Next time I think I'll knit the sock a bit longer and stop decreasing the toe sooner to graft more stitches since I'm not sure I like how pointy these toes are. I haven't blocked them yet so I should see how they look blocked first.
And finally!
Ta Da!
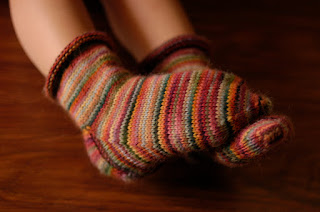
2 socks for about the knitting time of 1!

I really enjoyed this sock experience a good thing too since I still have to make another pair to keep peace in the house. Maybe my next sock challenge will be 2 pairs at once, 3 inside the 1!


I love these socks and love the little feet in them! So so sooooo cute!!!!
ReplyDeletehey karen, nice to see your knitting blog. i definitely want to make a few of your things. your big cowl necks are so appealing to me, and i have yet to tackle socks, but these look fun. i'm taking a lil' knitting break to do some design work. xo ricki
ReplyDeleteThank you for this tutorial. I can't wait to try it. I've knit a lot of socks over the years but my attention span is waning for the second sock. I hope this gets me going again!
ReplyDeleteThanks! If you do try it let me know, would love to see them!
ReplyDeleteThanks for posting this....can't wait to give this a try.
ReplyDeleteI'm so excited for this! I'm knitting the second sock for my daughter and I swore I'd never knit another pair because I hate doing the second one, like you said. This sounds like the perfect solution! (By the way, the only way I finish a pair of socks/sleeves/etc. is that I won't allow myself to start another project til I finish the one I'm sick of.)
ReplyDeleteHope you enjoy the process! I felt such satisfaction pulling the one sock out of the other knowing the second one wasn't looming over me ;)
DeleteThis is so cool and as soon as I saw it I had to cast on. So I did, late at night when i should not be trying something new and fiddly! After a half inch i looked to see how it was going and realized I had forgotten to bring the yarn forward in two spots. :( upon reflection it occurred to me that if I just drop back that one single stitch I could easily unhook the loop and reknit just that one stitch. No ripping out and trying replace bunches of stitches! Because that would have been a huge pain! Really, a loop over onto the inside sock is so easy to fix!
ReplyDeleteOf course!!! That is the solution :D because yes, putting all those stitches back onto a tiny needle is a HUGE pain!!! ;) Thanks for sharing and keep in touch, would love to hear how it goes and maybe see some photos!
Delete